Description
Lexol provides vital lubrication to keep leather soft while maintaining its strength, durability and beauty. Microscopically fine oil droplets penetrate to combine with the fibers and stay there. This controlled lubrication lets lexol nourish and revitalize leather while avoiding seepage into adjacent materials. Lexol renews the rich luster of leather, assuring a smooth, satin finish while restoring the supple, comfortable feel. What's more, it gives immediate protection to wet or dry leather-without ever leaving an oily residue.
Lexol Leather Conditioner has a liquid base which allows the product to penetrate the surface into leather pores, for deep conditioning that helps prevent cracking and premature aging.
Lexol Leather Conditioner leaves no greasy residue and it contains no silicon ingredients which dry out leather over time. Lexol Leather Conditioner results in supple, strong, and beautiful leather.
Features:
Ideal for use on: leather auto upholstery, footwear, furniture, handbags & briefcases, sports equipment and luggage
Protects leather against cracking and premature aging
* Conditions and protects light colored leather without darkening.* Mixes freely with water making the product equally useful on wet or dry leather* Nourishes the collagen and elastin proteins of the leather fibers* Not intended for suede or other rough-finished leathers
This top is one of the most comfortable you'll ever wear, crafted for all-day ease. It features a bold, screen-printed diagonal flag design, adding a stylish touch to your wardrobe. Perfect for casual wear, it blends comfort and a distinctive, patriotic flair seamlessly.
**Black Fabric Content - Cotton Spandex - 95%Cotton/5%Spandex
Description
"Life is Fragile, Handle With Prayer" embroidered in fancy white lettering and crosses in the top corners on a black background with white trim and has heat sealed backing for easy iron-on application. All patches are designed in the USA and feature original artwork you will not find anywhere else. High thread count embroidery contributes to high quality and long lasting durability of our superior patches! Unmatched when it comes to bright colors and intricate, incredible designs, our patches are created for easy sewing onto your favorite jacket or vest. Customize your gear with one of our embroidered patches. We guarantee you’ll find a favorite amongst our many designs!
Patch Sewing Instructions:
Note: Sewing by hand will give you greater control and is easier than trying to use a sewing machine when sewing into leather. Sewing on a patch will leave permanent holes on your jacket to please be careful about placement before you start.
Identify where you want the patch and outline the area with tailor’s chalk
Using a sewing pick, pick open the bottom seam of your garment lining just enough to allow your hand to fit inside the garment
Position your inside hand so it is resting flat between the lining and outlines area
Use your outside had to position the patch, you can lightly spray leather adhesive on the area to hold the patch, however this is not a permanent adhesive
Begin threading your upholstery needle using a strong nylon thread that matches your patch, use your thimble to push the needle through the leather moving from inside the item to the outside
This will allow the knot to be on the inside of the item, then pull the needle through and out with your outside hand and back down through the patch and leather
Continue this pattern all around the patch, keeping stitches close together and to the end of the patch for the most secure attachment
Once you have gotten back to where you started, send the needle through the first stitch, and loop it around a few times to make a finishing knot
Finally restitch the garments lining and your all set
Patch Iron-on Instructions:
Preheat your iron to 325-335 degrees. Do Not Use Steam
Press the area where you want your patch to be for 25 seconds
Position the patch on the garment so that it is positioned where you would like it to be
Place a lightweight cloth over the patch, using a back-and-forth motion with medium pressure ron the area for 15 seconds
The iron should never come into direct contact with the patch
Carefully turn your garment inside out, using the same back and forth motion firmly iron the inside of the item where your patch is for about 1 minute
Turn the garment right side in once more, use your clean lightweight cloth to cover the patch
Iron the edges of the patch through the cloth to ensure they are thoroughly sealed
Let the garment cool completely before wearing
Lightweight Balaclava
Slip-on, ride on. This ultra-light, breathable balaclava adds a comfortable under-helmet layer for motorcycling and other powersports—shielding your face and neck from wind, sun, and dust without the bulk.
Features
Thin, 4-way stretch fabric fits easily under any helmet.
Moisture-wicking & quick-drying to help keep you cool and comfortable.
Flat-seam construction reduces pressure points and hot spots.
Extended neck coverage for extra protection from the elements.
Multi-wear versatility: full balaclava, open-face, or neck gaiter.
Unisex, one size fits most with a low-profile fit for goggles or glasses.
Materials & Care
Fabric: lightweight polyester/spandex blend.
Machine wash cold, mild detergent; line dry. Do not bleach or iron.
Best For
Spring/Summer/Fall riding, commuting, ADV, and general powersports.
Layering under full-face, modular, or open-face helmets.
Fit tip: For very cold conditions, pair with a fleece neck gaiter or midweight balaclava.
Possibly one of the most versatile pieces of motorcycle apparel - a simple balaclava can make all the difference on your next ride!
Lightweight and breathable, use them for the hot weather to keep your helmet free of sweat, or use it in the cold weather to keep your face from being exposed to the elements. We're proud to offer a wide range of color options to make sure your personality shines through, even with a helmet on!
Description
"RIDE IT LIKE YOU STOLE IT" is embroidered in orange lettering onto a black background with heat sealed backing for easy iron-on application. All patches are designed in the USA and feature original artwork you will not find anywhere else. High thread count embroidery contributes to high quality and long lasting durability of our superior patches! Unmatched when it comes to bright colors and intricate, incredible designs, our patches are created for easy sewing onto your favorite jacket or vest. Customize your gear with one of our embroidered patches. We guarantee you’ll find a favorite amongst our many designs!
Patch Sewing Instructions:
Note: Sewing by hand will give you greater control and is easier than trying to use a sewing machine when sewing into leather. Sewing on a patch will leave permanent holes on your jacket to please be careful about placement before you start.
Identify where you want the patch and outline the area with tailor’s chalk
Using a sewing pick, pick open the bottom seam of your garment lining just enough to allow your hand to fit inside the garment
Position your inside hand so it is resting flat between the lining and outlines area
Use your outside had to position the patch, you can lightly spray leather adhesive on the area to hold the patch, however this is not a permanent adhesive
Begin threading your upholstery needle using a strong nylon thread that matches your patch, use your thimble to push the needle through the leather moving from inside the item to the outside
This will allow the knot to be on the inside of the item, then pull the needle through and out with your outside hand and back down through the patch and leather
Continue this pattern all around the patch, keeping stitches close together and to the end of the patch for the most secure attachment
Once you have gotten back to where you started, send the needle through the first stitch, and loop it around a few times to make a finishing knot
Finally restitch the garments lining and your all set
Patch Iron-on Instructions:
Preheat your iron to 325-335 degrees. Do Not Use Steam
Press the area where you want your patch to be for 25 seconds
Position the patch on the garment so that it is positioned where you would like it to be
Place a lightweight cloth over the patch, using a back-and-forth motion with medium pressure ron the area for 15 seconds
The iron should never come into direct contact with the patch
Carefully turn your garment inside out, using the same back and forth motion firmly iron the inside of the item where your patch is for about 1 minute
Turn the garment right side in once more, use your clean lightweight cloth to cover the patch
Iron the edges of the patch through the cloth to ensure they are thoroughly sealed
Let the garment cool completely before wearing
Streamlined mesh protection with an adjustable riding fit
The Limited is a streamlined mesh jacket built around three priorities: airflow, protection, and fit. Full-mesh panels move air across the body, reinforced 600D Cordura polyester supports high-stress areas, and CE Level 2 shoulder and elbow armor with multi-point adjustments help keep protection positioned while riding.
FULL-MESH AIRFLOW
CE LEVEL 2 ARMOR
2 CONCEALED CARRY
PHONE + SNAP STORAGE
FIT ADJUSTMENTS
Key Features
Full-mesh ventilation: Chest, back, and inner-arm panels channel continuous airflow.
CE Level 2 shoulder and elbow armor: Provides the higher of the standard's two impact levels at the shoulders and elbows; a dedicated pocket accepts an optional back protector.
Two concealed-carry pockets: Two dedicated interior pockets provide discreet snap-close storage.
Phone and snap-close storage: One cell phone pocket and one snap-close pocket organize essentials; exterior pockets retain zipper closures.
Hook-and-loop adjustments: Waist, cuff, and bicep tabs fine-tune fit and help hold the armor in place.
600D Cordura® polyester reinforcement: Strengthens high-stress shoulder and outer-arm areas against tearing and abrasion.
Reflective printing: Arm and back placement helps improve low-light visibility from the side and rear.
Pre-curved sport fit: A shorter cut and shaped sleeves help reduce bunching in the riding position.
Locking Tool Bag
Material: Synthetic
Features:
Quick connect clasped straps
Metal lock attachment
Two synthetic straps for attachment
Includes two little combination locks
Dimensions: 11.5"x 4.5"x 3.75"
Heat-sealed backing for easy iron-on application.
4 inch x 4 inch
All patches feature a heat- sealed backing. This means that our patches may be ironed on or sewn on to most clothing easily.
Patch Sewing Instructions:
Note: Sewing by hand will give you greater control and is easier than trying to use a sewing machine when sewing into leather. Sewing on a patch will leave permanent holes on your jacket to please be careful about placement before you start.
Identify where you want the patch and outline the area with tailor’s chalk
Using a sewing pick, pick open the bottom seam of your garment lining just enough to allow your hand to fit inside the garment
Position your inside hand so it is resting flat between the lining and outlines area
Use your outside had to position the patch, you can lightly spray leather adhesive on the area to hold the patch, however this is not a permanent adhesive
Begin threading your upholstery needle using a strong nylon thread that matches your patch, use your thimble to push the needle through the leather moving from inside the item to the outside
This will allow the knot to be on the inside of the item, then pull the needle through and out with your outside hand and back down through the patch and leather
Continue this pattern all around the patch, keeping stitches close together and to the end of the patch for the most secure attachment
Once you have gotten back to where you started, send the needle through the first stitch, and loop it around a few times to make a finishing knot
Finally restitch the garments lining and your all set
Patch Iron-on Instructions:
Preheat your iron to 325-335 degrees. Do Not Use Steam.
Press the area where you want your patch to be for 25 seconds
Position the patch on the garment so that it is positioned where you would like it to be
Place a lightweight cloth over the patch, using a back-and-forth motion with medium pressure ron the area for 15 seconds
The iron should never come into direct contact with the patch
Carefully turn your garment inside out, using the same back and forth motion firmly iron the inside of the item where your patch is for about 1 minute
Turn the garment right side in once more, use your clen lightweight cloth to cover the patch
Iron the edges of the patch through the cloth to ensure they are thoroughly sealed
Let the garment cool completely before wearing
Heat-sealed backing for easy iron-on application.
10 Inch
All patches feature a heat- sealed backing. This means that our patches may be ironed on or sewn on to most clothing easily.
Patch Sewing Instructions:
Note: Sewing by hand will give you greater control and is easier than trying to use a sewing machine when sewing into leather. Sewing on a patch will leave permanent holes on your jacket to please be careful about placement before you start.
Identify where you want the patch and outline the area with tailor’s chalk
Using a sewing pick, pick open the bottom seam of your garment lining just enough to allow your hand to fit inside the garment
Position your inside hand so it is resting flat between the lining and outlines area
Use your outside had to position the patch, you can lightly spray leather adhesive on the area to hold the patch, however this is not a permanent adhesive
Begin threading your upholstery needle using a strong nylon thread that matches your patch, use your thimble to push the needle through the leather moving from inside the item to the outside
This will allow the knot to be on the inside of the item, then pull the needle through and out with your outside hand and back down through the patch and leather
Continue this pattern all around the patch, keeping stitches close together and to the end of the patch for the most secure attachment
Once you have gotten back to where you started, send the needle through the first stitch, and loop it around a few times to make a finishing knot
Finally restitch the garments lining and your all set
Patch Iron-on Instructions:
Preheat your iron to 325-335 degrees. Do Not Use Steam.
Press the area where you want your patch to be for 25 seconds
Position the patch on the garment so that it is positioned where you would like it to be
Place a lightweight cloth over the patch, using a back-and-forth motion with medium pressure ron the area for 15 seconds
The iron should never come into direct contact with the patch
Carefully turn your garment inside out, using the same back and forth motion firmly iron the inside of the item where your patch is for about 1 minute
Turn the garment right side in once more, use your clen lightweight cloth to cover the patch
Iron the edges of the patch through the cloth to ensure they are thoroughly sealed
Let the garment cool completely before wearing
PRODUCT FEATURES:
Lambskin Leather
Double breasted trench coat
Two hand pockets with button closer
Adjustable belt and cuffs
Zip out shell liner
2 year warranty on hardware
Product Description:
Show off some skin in this sleeveless graphic pick featuring a figure-flattering fit and a vintage faded wash.
Full graphic text: Long live the brave, always and forever. Stay strong. Wild and free.
Size S: 26.5'' long from high point of shoulder to hem
95% rayon / 5% spandex
Machine wash
Assembled in the USA using imported materials
LONG LIVE BRAVE SKULL ROSES SIZING CHART
SIZE
NUMERIC-SIZE
BUST
WAIST
HIP
SMALL
4 - 6
34.5"- 35.5"
26"- 27"
36"- 37"
MEDIUM
4 - 6
36.5"- 37.5"
28"- 29"
38"- 39"
LARGE
12-14
39"- 40.5"
30.5"- 32"
40.5"- 42"
X-LARGE
16-18
42"- 43.5"
33.5"- 35"
43.5"- 45"
2X-LARGE
20-22
45"- 46.5"
36.5"- 38"
46.5"- 48"
3X-LARGE
22-24
47.5"- 51"
41"- 45"
50"- 53.5"
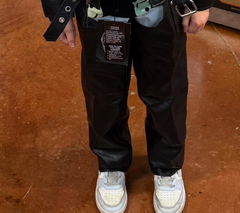
Hardly anyone makes riding gear for kids. I like that these will protect her legs from wind and other things. They will protect her in the event of a slide also. Now just need to find her some Kevlar shorts to go under them and protect her behind.
Kids Bolt On Pocket Chaps
Alexander Varg
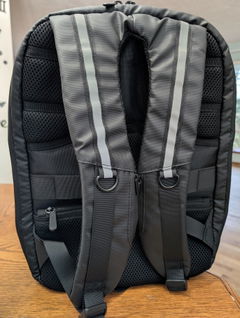
The backpack is well thought out and highly functional.
Nice backpack. I bought it for my daughter as a birthday present, and she loves it. Being able to change pictures and animations from her phone is a big hit. Overall, the build quality is good. It has two laptop/tablet pockets, three external pockets, and a pair of very useful attachment rings. The backpack is well thought out and highly functional.
The only thing to consider is securing the power bank inside. You can place it in the inner pocket, but we decided to sew in a Velcro patch with a quick-release setup. This keeps it from moving around while still making it easy to remove for charging when needed.
LED Backpack Bag
Dana Roland
Cozy Kevlar with Real-World Fit — Petite-Friendly and Ride-Ready
Eagle Leather’s Women’s Kevlar Sweatpants are exactly what I hoped for in moto pants: soft, incredibly comfortable, and thoughtfully designed for riders. The fabric feels great on long days, and the pockets for hip and knee armor make it easy to add protection without bulk. I’m petite (5'0") and the medium fits perfectly — no awkward dragging or bunching.
I also appreciate the ankle zippers for a clean fit over boots, plus the overall look is stylish and well-made. I initially received the wrong size, but Eagle Leather’s customer service was excellent and fixed it fast. Shipping was timely, communication was clear, and the whole experience felt seamless.
If you want comfortable Kevlar sweats that actually fit petites and still look polished, these are a winner.
Women's Kevlar Sweatpants
Anonymous
Exactly what I was hoping for
Exactly what I was hoping for. Looks amazing. Great quality. Got it in a timely manner
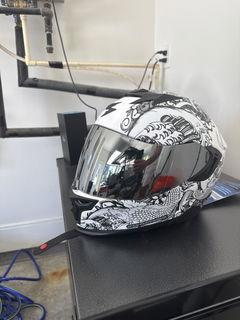
EXO-T520/ ST1400/ R1 AIR FACESHIELD SILVER MIRRORED
Jeff
I went from a 5 to an 8 wearing this.
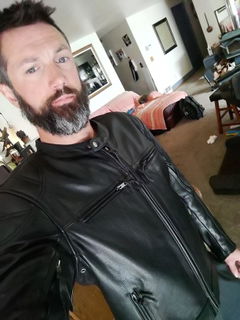
It was so great to try on every jacket while at the store. Even my dog got to try on a vest, it looked great but she prefers to be a nudist. I am stoked about all the indecisiveness I get to have with this jacket. Do I want the inner vest today or should I take it out? Wanna look a little more puff for the ladies? Just slip the armor into those elbows and shoulders. Is it blazing hot but illegal to be naked where I'm riding? Take it all out and open the zippered vents to get some wind blowing on my body. Oooh yeah, it's gonna feel good to get home safely and take of my pants and jacket.